Deploy LLM in HuggingFace Spaces For Free Using Ollama
In this tutorial, we’ll explore how to deploy Large Language Models (LLMs) for free using Ollama and LangChain on Hugging Face Spaces. This approach allows you to leverage powerful language models without the need for expensive GPU resources or complex infrastructure.
Prerequisites
- A Hugging Face account
- Basic knowledge of Python, FastAPI, and Docker
- Familiarity with LLMs, Ollama, and LangChain
Step 1: Setting Up the Project
First, let’s create our project structure:
llm-space/
├── app.py
├── Dockerfile
├── requirements.txt
└── start.sh
Step 2: Creating the FastAPI Application
In app.py, we’ll create a FastAPI application that uses Ollama and LangChain. We will be using TinyLlama from Ollama because of its size of around 700 mb. Since, HuggingFace provides limited Hardware, TinyLlama works fine and provides faster response than other models.
import os
import logging
from fastapi import FastAPI, HTTPException
from fastapi.responses import StreamingResponse
from pydantic import BaseModel
from langchain_community.llms import Ollama
from langchain.callbacks.manager import CallbackManager
from langchain.callbacks.streaming_stdout import StreamingStdOutCallbackHandler

logging.basicConfig(level=logging.INFO)
logger = logging.getLogger(__name__)

app = FastAPI()
MODEL_NAME = 'tinyllama'

def get_llm():
    callback_manager = CallbackManager([StreamingStdOutCallbackHandler()])
    return Ollama(model=MODEL_NAME, callback_manager=callback_manager)

class Question(BaseModel):
    text: str

@app.get("/")
def read_root():
    return {"Hello": f"Welcome to {MODEL_NAME} FastAPI"}

@app.on_event("startup")
async def startup_event():
    logger.info(f"Starting up with model: {MODEL_NAME}")

@app.on_event("shutdown")
async def shutdown_event():
    logger.info("Shutting down")
Step 3: Creating the Dockerfile
Create a Dockerfile to set up the environment:
FROM python:3.9-slim

# Install curl and Ollama
RUN apt-get update && apt-get install -y curl && \
    curl -fsSL https://ollama.ai/install.sh | sh && \
    apt-get clean && rm -rf /var/lib/apt/lists/*

# Set up user and environment
RUN useradd -m -u 1000 user
USER user
ENV HOME=/home/user \
    PATH="/home/user/.local/bin:$PATH"

WORKDIR $HOME/app

COPY --chown=user requirements.txt .
RUN pip install --no-cache-dir --upgrade -r requirements.txt

COPY --chown=user . .

# Make the start script executable
RUN chmod +x start.sh

CMD ["./start.sh"]
Step 4: Creating the Start Script
Create start.sh to initialize Ollama and start the FastAPI server:
#!/bin/bash

# Set environment variables for optimization
export OMP_NUM_THREADS=4
export MKL_NUM_THREADS=4
export CUDA_VISIBLE_DEVICES=0

# Start Ollama in the background
ollama serve &

# Pull the model if not already present
if ! ollama list | grep -q "tinyllama"; then
    ollama pull tinyllama
fi

# Wait for Ollama to start up
max_attempts=30
attempt=0
while ! curl -s http://localhost:11434/api/tags >/dev/null; do
    sleep 1
    attempt=$((attempt + 1))
    if [ $attempt -eq $max_attempts ]; then
        echo "Ollama failed to start within 30 seconds. Exiting."
        exit 1
    fi
done

echo "Ollama is ready."

# Print the API URL
echo "API is running on: http://0.0.0.0:7860"

# Start the FastAPI server
uvicorn app:app --host 0.0.0.0 --port 7860 --workers 4 --limit-concurrency 20
Step 5: Creating the Requirements File
Create requirements.txt with the necessary dependencies:
fastapi
uvicorn
langchain
langchain_community
ollama
Step 6: Setting Up Hugging Face Space
Go to Hugging Face and sign in.
Click on Profile Icon then “New Space” or Click on Spaces then “Create new Space”

Give your space a name and set it to “Public” if you want others to access it. Choose a License or leave it blank.

Choose “Docker” then “Blank” as the Space SDK.

Choose the FREE Space Hardware. Then Select “Public” because we will be using FastAPI and this requires a Public Space which provides as the url to access the model.

After clicking “Create Space”, we will get instructions like this:

Step 7: Uploading Files to Hugging Face Space
Upload the following files to your Hugging Face Space:

OR
Clone the repo and then copy the files in the local repo (Recommended)
app.pyDockerfilerequirements.txtstart.sh
git add .
git commit -m "Push"
git push
Step 8: Building and Deploying
Once you’ve uploaded all the files, Hugging Face Spaces will automatically detect the Dockerfile and start building your container. This process may take a few minutes.


After the process is completed, you will see something like this message.
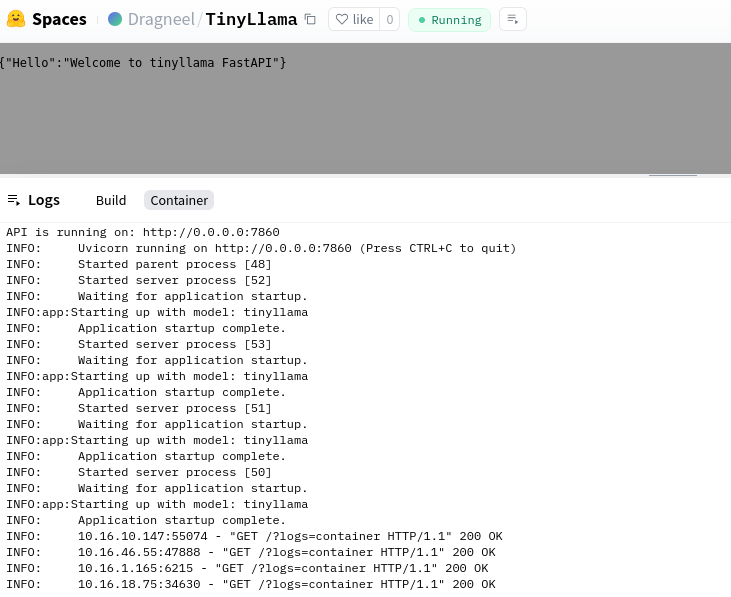
Step 9: Testing Your Deployment
After the build is complete, you can test your deployment by:
- Accessing the Space URL provided by Hugging Face.
Click on the three dots beside the “Settings” and “Select Embed this Space”. Remember, You won’t see “Embed this Space” if your repo is private.

- Using the FastAPI Swagger UI (usually available at
/docs) to test the/askendpoint.


The response will be slower at first (20 seconds) but it relatively gets better (10 to 15 seconds) depending on the output. That’s why it is better to stream the response.
Feel Free to Make any Changes in the Local Repo and push the changes. HuggingFace will detect those changes. You can also change the model from TinyLlama to Gemma or Phi 3 mini. While the response will be better, the response will be slower.
Conclusion
You’ve now successfully deployed an LLM using Ollama and LangChain on Hugging Face Spaces for free. This setup allows you to run inference on various language models without the need for expensive GPU resources.
Remember that free tier resources on Hugging Face Spaces are limited, so this setup is best for small-scale projects or demonstrations. For production use or larger workloads, you might need to consider upgrading to a paid tier or exploring other hosting options.
Happy coding and enjoy your free LLM deployment!


0 Comments