Recently I took a deep dive into Microsoft flow, and the first task I gave myself was using MS flow for one of the projects I have done in the past. In my former company I was tasked by the legal team to develop a solution that auto-generates contract document based on a predefined template and route it for approval. They wanted to standardized the document so that any contract document leaving the bank to the customers will have the same format. I did this without writing a single line of code, using SharePoint Designer Workflow, List and InfoPath I was able to meet their requirements.
Initially doing this in MS flow seemed impossible, but because MS flow has an action that supports REST APIs I was determined to code it if required. But it turns out to be simpler than it seemed. I used a REST API to achieve it though, but later discovered an action that saved me the two steps introduced by the REST API. I will cover the two methods in this post.
We will start by creating a content type and its associated site columns. We will then upload a template to it and apply the content type to a document library. If you have done this before, jump to the part that interests you the most.
1. Go to the Site Settings (select from the gear icon at the upper right corner on SP online) and click Site content types under Web Designer Galleries.
2. Click Create and name it Contract Agreement.
3. In the "select content type from" select Document Content Types.
4. Select Document in the Parent Content Type dropdown.
5. Then in the Put this content type into, select New group and type Contract Content Types in the field. I always like to create a new group for my content types.
the page should look like this when you are done:
6. Click Ok to close the page
7. Now look for your content type i.e. Contract Content Types and click Contract Agreement
8. For the purpose of this demo, let's create 3 columns namely Client Name -data type: single line of text, Contractor Name -data type: single line of text and Amount - data type: currency. Choose Add from new site column to create the columns. It should look like this
9. Now create a document library called Contracts based on Microsoft word document template (if you use the advanced options)
10. Now let's apply the content type to the library. Go to the library and click library settings. If you are using SP online, you will find library settings in the gear icon at the upper right corner.
11. On the library settings page, click Advanced settings and click Allow management of content types radio button. Click Ok to go back to library settings.
12. You should now see Content Types category. click Add from existing site content types
13. In the Select site content types from, select Contract Content Types from the dropdown.
14. Select Contract Agreement and click Add to move it to Content types to add box, then click Ok.
Now let's create a custom list that we will use to create content that will be embedded in the generated document.
15. Create a custom list called ContactForm and create these 3 columns: Client Name, Contractor Name and Amount. If you like you can also create a content type with these columns and apply it to the list just as we did for the library. But note, parent content type will be List content type and NOT Document.
Now let's prepare our template. You can download any sample contract (word) document template from the internet and modify it to suit your purpose. But
here is one you can use.
If you downloaded my sample, upload it to Contract library, then open it from within the library in word document. See the image below:
16. Click Open in word to open it with word program on your computer.
17. When it is opened, click Insert and select Quick Parts to open the sub-menu.
18. In the sub-menu, click Document Property, then select appropriate column to fill the gaps in the template.
19. When you are done, save a copy on your system drive. Your template should look like this:
20. Now go back to Site content type page. See step 1 on how to navigate there.
21. Look for Contract Content Types, and select Contract Agreement.
22. Click Advanced Settings under Settings.
23. Click Upload a new document template and upload the template above.
24. Leave other settings as default and click Ok.
25. Now go back to the library i.e. Contracts library and click on New. You should see your template in the drop down menu. You may want to make your content type the default and the only content type for the library.
If you click on it, it should open your template with the placeholders in it.
Now it's time to move to Microsoft flow.
1. Open the ContactForm list you created earlier and click on Flow, then Create a flow.
2. In the Create a flow palette, click When a new item is added in SharePoint, complete a custom action.
3. On the page that opens, click Continue, then click Edit in When a new item is created to auto select the current site and the list. Note: Flow is outside of your SharePoint environment, so you may need to sign in if you are not signed in automatically.
4. Click New step and select Add an action.
5. In the Add an action, select SharePoint and search for Get file content, click to add.
6. In the Site Address field, select the site where the library is. Note it allows you to enter a custom site url which means you can use a different site other than the site you are currently working. This is an advantage over SharePoint Designer (SPD).
7. In the File Identifier, click the picker, then select Contracts > Forms > Contract Agreement > ContractAgreement.docx (or whatever you named your template name).
8. Click New step and add Create File, follow the step above to add Create File action.
9. Then select your site, the folder should be the library i.e. Contracts.
10. Set the focus in File Name, then under when a new item is created in the Dynamic Content, select Title, then append .docx to the title. Here we are creating a word document name using the title of our list item.
11. In the File Content, select File Content under Get file content in the Dynamic Content flyout. This action creates a new word document based on the template and copy its content using File Content output. This step should look like this:
with this step you have succeeded in creating a new word document based on the template. But we need to replace the placeholders in the template with the content of our list items.
Like I mentioned before, there are two ways to do this. One will interest developers and the other is lovable to Administrators or power users.
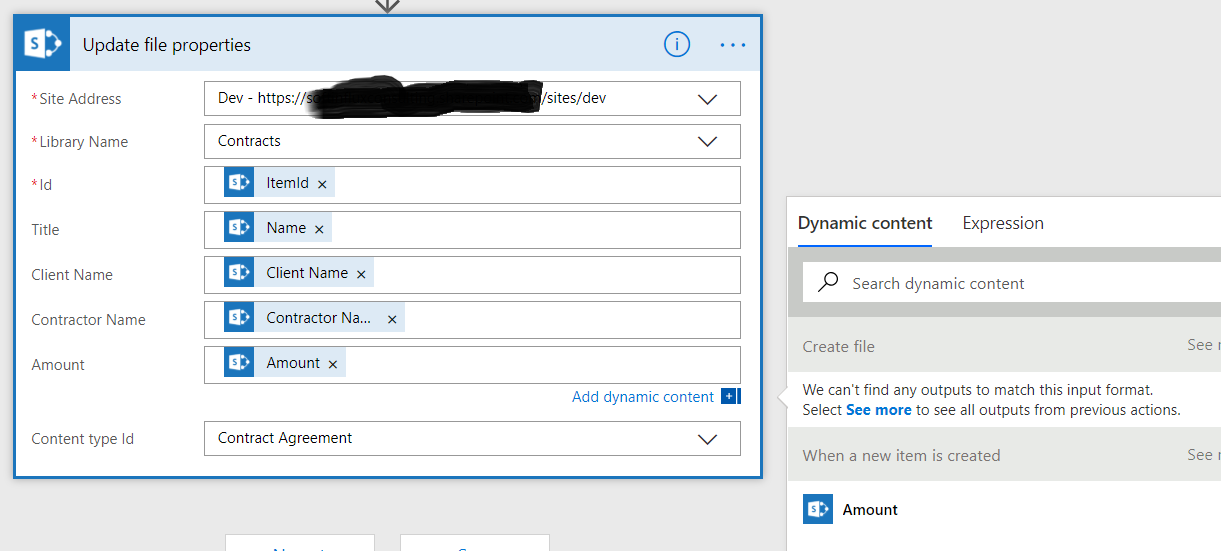
First Method uses Update file properties action and its actually the best method:
12. Add Update file properties action using New step, and configure as follows:
Notice the I have selected ItemId from Create File as Id of the document to update and Name of the document as Title. Note that Title is different from document name in SharePoint library. It is optional so you can leave it empty. But set Client Name, Contractor Name and Amount -these are all selected from when a new item is created category of the Dynamic Content fly-out.
Second Method:
This is the initial approach I used before I discovered the Update file properties action. If you are a developer you will find it interesting to know that Flow functionalities can be extended with REST APIs. But this method introduces another action step: Get file properties.
13. Add a new step and pick Get file properties from Add an action. Note you have to remove Update file properties if you already added it.
14. Configure it as follows:
15. Then add Send an HTTp request to SharePoint action and configure it as follows:
Note: The body has to be in JSON format.
Let's include one last step. Usually you will want to send a contract to a vendor for review before it is finally approved and printed for sign off. MS Flow makes it possible for you to send the generated document as an attachment in an email to the vendor assuming they don't have account created for them on your office 365. So let's add Send email with options step and configure it as follows:
We have two options here: It is Okay, and Review Needed. You can further customize the flow based on the vendor's response. I think is cool if you are looking to automate your contract agreement process back to back.
To finish, click Save to save your changes.
To test, open ContractForm list and fill it
If everything works fine, you should see a new document created in your Contracts library with the name Contractual Agreement or whatever name you used in the title field above. Open it in word to see how the workflow has populated the document with the content from the list. Note: You won't see the changes if you open it in browser. You have to open in word.
I hope you find it helpful.
 3. In the "select content type from" select Document Content Types. 4. Select Document in the Parent Content Type dropdown.5. Then in the Put this content type into, select New group and type Contract Content Types in the field. I always like to create a new group for my content types.the page should look like this when you are done:
 6. Click Ok to close the page7. Now look for your content type i.e. Contract Content Types and click Contract Agreement 8. For the purpose of this demo, let's create 3 columns namely Client Name -data type: single line of text, Contractor Name -data type: single line of text and Amount - data type: currency. Choose Add from new site column to create the columns. It should look like this


 We have two options here: It is Okay, and Review Needed. You can further customize the flow based on the vendor's response. I think is cool if you are looking to automate your contract agreement process back to back.
 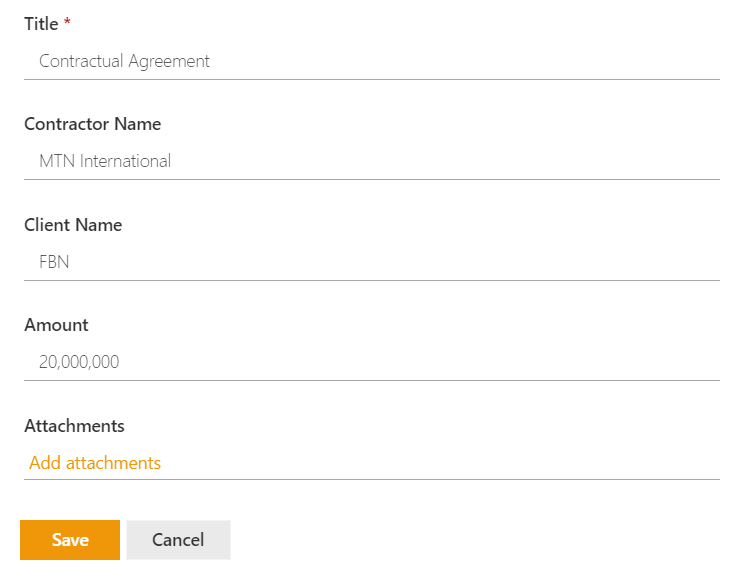 If everything works fine, you should see a new document created in your Contracts library with the name Contractual Agreement or whatever name you used in the title field above. Open it in word to see how the workflow has populated the document with the content from the list. Note: You won't see the changes if you open it in browser. You have to open in word.


0 Comments